How to Use the GameSir T7 Pro Retro Green
How to Use the GameSir T7 Pro Retro Green
Retro Vibe, Modern Tech. Wired for XBOX & Wireless for PC/Mobile
Product Overview
Key Features
- • Tri-Mode Connectivity: Bluetooth, 2.4G Wireless, and Wired
- • GameSir Mag-Res™ TMR sticks for smoother control
- • Hall Effect analog triggers, with 2-stage trigger stops
- • Fully software-customizable
Tech Specs
- • Working Platform:XBOX, PC, Android
- • Connection: Tri-mode for XBOX and PC; Bluetooth for Android
- • Weight: 272 g / 0.60 lbs
- • Supported Software: GameSir Nexus app
System Requirements
Windows PC
Windows 10/11 Bluetooth, Wireless Dongle, Wired
XBOX
XBOX One, XBOX Series X|S Wired
Android
Android 8.0 or above Bluetooth
Getting Started

1Connection State
| XBOX Indicator | description |
|---|---|
| Breathing | Reconnecting State *It can connect to previously paired devices. |
| Flowing Light Mode(Surround FlowingEffect) | Paring State (Bluetooth Mode)*In this state, it can be discovered and paired with devices. |
| Solid | Connection Successful |
| Off | Power-off State *The controller will enter standby state after 10 minutes ofinactivity in 2.4G or Bluetooth mode. |
2Operation Instructions
| Description | Operation |
|---|---|
| Power On/Off | Short press the XBOX button to power on. While powered on, press and hold the XBOX button for 5 seconds to power off. |
| Pairing | In Bluetooth mode, press and hold the pairing button for 2 seconds to enter forced pairing mode. |
| Preset Configuration Switching | M+Y Configuration 1|M+B Configuration 2|M+A Configuration 3|M+X Configuration 4 |
| Hair Trigger Mode | Enable/disable hair trigger mode Press and hold the M button + LT/RT for 2 seconds |
| Light Effects Switch | Switch among 4 light effects. M + Left Stick's Left/Right. *The setup will still be saved after restart. |
| LED brightness | Increase/Decrease LED brightness. 5 levels, default is the brightest. M + Left Stick's Up/DownThe setup will not be saved after restart. |
| Trigger Mode Switch | Switch between long and short trigger pulls by toggling trigger gear switch. |
| Low Battery | When the battery is below 15%, the XBOX indicator will flash red. |
| Charging | You can charge the controller via the Type-C port or the charging station. |
3Windows Connection Tutorial
Wired Connection
- Use the included Type-C cable to connect the controller to your computer, then press the XBOX button briefly to power on.
- Once connected successfully, the XBOX indicator will remain solid.
Receiver Connection
- Insert the receiver into the computer.
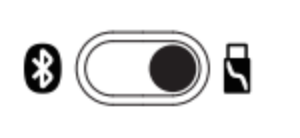
- Switch the controller to the 2.4G mode, and press the XBOX button briefly to power on. Wait for the controller to connect.
- Once connected successfully, the XBOX indicator will remain solid.
4Android Connection Tutorial
Bluetooth Connection
- Toggle the controller's mode switch to the Bluetooth mode,and press the XBOX button briefly to power on.
- Open the Bluetooth list on your phone, find the device named GameSir-T7 Pro, and click to connect.
- Once connected successfully, the XBOX indicator will remain solid.
- If the connection is unsuccessful, press and hold the paring button on the controller tore-enter pairing status.

5XBOX Connection Tutorial
WIRED CONNECTION
-
Use the included Type-C cable to connect the controller to the XBOX console, then press the XBOX button briefly to power on.
-
Once connected successfully, the XBOX indicator will remain solid.
- Only supports wired connection.
6Calibration
Sticks & Triggers
1.Set the trigger to analog mode, then press and hold View Button + Menu Button + M Button until the XBOX indicator starts flashing slowly.
2.Ensure that the LT & RT triggers and the left & right sticks are not being touched. Then Press the A button. The XBOX indicator will turn off.
3.Press the LT & RT triggers to their maximum travel for 3 times. Rotate the left & right sticks to their maximum angles for 3 times. Press the A button. A solid light on the XBOX indicator indicates that the calibration is complete.
GYROSCOPE
When Gyroscope malfunctions, Place the controller on a stable, flat surface. Hold M Button + Share Button and the gyroscope will automatically start the calibration. During the calibration, the RGBstrips will flash red and blue alternately. When the RGB strips returns to their originallighting effect, the calibration is complete.
7Controller Reset
-
If the controller encounters issues such as being unable to power on or off properly, youcan use a small object similar to the size of a paperclip to press the Reset button insidethe circular hole on the back of the controller. This will force the controller to power off.
-
If the controller encounters issues such as being unable to power on or off properly, you can Hold View Button + Menu Button + M Button till the logo Button blink. This action will reset the profile and all the settings of the controller.
Advanced Tutorials
Extra Button Mapping
Set the extra button value: Press and hold the M button + L4/R4 button, and the Xboxindicator will start flashing slowly. Press the button you want to map to the extra button,and the XBOX indicator will return to a solid light, indicating that the extra button setting iscomplete.
- Within the setting mode, pressing the corresponding extra button will clear its button value.

Volume Adjustment
Adjust Master Volume
Hold the M button + D-pad Up/Down (11 levels in total)
Note: You'll hear a beep when reaching the maximum or minimum level.
Adjust Game/Voice Balance
Hold the M button + D-pad Left/Right
Left: increase game volume, decrease voice volume. Right: Decrease game volume, increase voice volume.
Note: You'll hear a beep when reaching the maximum, middle, or minimum level.
Mute Function
Press the Mute button to turn on the mic mute function (indicator turns red). Press it again to turn it off (indicator turns off).
Note: When the Mute function is turned on, hold the Mute button to temporarily turn it off. Release the Mute button to turn it back on.
FAQ
Frequently Asked Pre-sale Questions
1.What platforms does the GameSir T7 Pro Sugar Whirl support?
The GameSir T7 Pro Sugar Whirl supports XBOX, PC and Android.
2.What polling rate does the GameSir T7 Pro Sugar Whirl support?
250 Hz on XBOX, up to 1000 Hz on PC
3.What are the special features of the sticks?
The T7 Pro Sugar Whirl is equipped with the latest GameSir Mag-Res™ TMR sticks, combining the precise performance and low power consumption of traditional potentiometer sticks with the exceptional durability of Hall Effect sticks, offering gamers a smoother, instantaneous, and anti-drift gaming experience like never before.
4.What trigger modes does the dual-mode trigger stop switch between?
The dual-mode trigger stops allow switching between Hall Effect analog triggers and Micro Switch triggers.
5.What’s the special meaning of the GameSir T7 Pro Sugar Whirl’s shell?
The controller’s shell features a dreamy, delicate swirl of sweet cotton candy and soft morning skies.
6.How many remappable macro buttons does the GameSir T7 Pro Sugar Whirl have?
It has two remappable macro buttons, including two extra back buttons.
7.Does the GameSir T7 Pro Sugar Whirl support motion control?
Yes. It features a built-in 6-axis gyroscope for motion control on PC.
8.Does the GameSir T7 Pro Sugar Whirl support customization software?
Yes. It is compatible with GameSir Nexus software, allowing users to customize button mapping and other settings.
9.How many motors does T7 Pro Sugar Whirl feature?
4 in total. One in each grip and each trigger, bring you the most realistic motion experience.
Frequently Asked Product Usage Questions
Can i buy replacement part?
We do not sell separate spare parts such as controller internal components, replacement buttons, USB ports, standalone receivers, or other internal repair parts. All original bundled accessories included with controllers are not available for individual purchase.
These accessories are manufactured to be used with the controller and are not sold separately.
Currently, the only items sold separately are:
1.Universal data cable,
2.Faceplate for the G7 series, Faceplate for Supernova, Carrying case for the G7 Pro,
3.Detachable Joystick Caps For G7 Pro & Cyclone 2
4.Anti-friction rings,
5.Thumb grip caps,
6.Charger for nova/nova 2 lite, Charger for cyclone 2,Cooler for X5 Lite ,Dongle for nova(Not for nova 1/2 lite)
7.Dongle compatible with the following controllers: Nova (HD), SuperNova, T3S, Tarantula, Cyclone, Cyclone Pro, X5s, G8+.(It Will not work with Cyclone 2, T4, T4 Pro, T4 Pro SE, G7 Pro, Nova Lite, and Nova Lite 2.)
You can view our separately sold accessories here: https://gamesir.com/collections/gamesir-accessories
Was this article helpful?
Let us know if you found this helpful or if you need more information.